-

I cook as a hobby, and I maintain this blog primarily to keep track of recipes that my family has enjoyed over the years. I started blogging back in 2015, in response to requests from friends for recipes they had seen me post on Facebook (but that I couldn’t easily catalog). My original blog was on another platform that became less user-friendly over time. I migrated my blog to WordPress earlier this year, and I’ve spent more time than expected reformatting the migrated posts.
This blog is and always will be a work in progress. For example, I currently provide Tags for posts, but I have not coded for Categories. I also generally try to share the recipes themselves in my posts, but in cases where the recipe is not available online, I try to identify the source (e.g., the cookbook title and author) as needed. In some cases, such as where a family has shared their recipe with me but hasn’t authorized me to share it widely, I post a photo of the dish with that proviso.
I recently added a Search widget to this blog. On the desktop version, the Search bar appears prominently on the left hand side. But for some reason, it is hidden on the mobile app. If you’re on your phone, tap on the SHOW tab at the top left of the home page. That will reveal another screen with the Search bar.
I hope you enjoy exploring my blog and find some recipes to try.
-

We tried this low-fat version of sweet kugel, but we modified the flavors to make it savory: http://www.eatingwell.com/recipe/251508/simple-noodle-kugel/ First, preheat oven to 350. Coat a 9×13″ glass baking dish with cooking spray. Second, Boil 10 oz wide egg noodles, drain, and cool with cold water, and set aside to drain. Third, heat 2 Tbsp butter in a nonstick pan, then saute 2 large shallots (sliced along the grain) until fragrant, then 1 minute later add 4-5 garlic cloves (minced). Add ½ cup breadcrumbs (this will absorb most of the remaining butter) and add 1 tsp thyme leaves, then saute for another minute. Set aside. Fourth, in a large mixing bowl, whisk 2 large eggs, 2 egg whites, and ¼ cup cornstarch. Mix in 2 cups each low fat cottage cheese, nonfat plain yogurt (not Greek), 1 cup skim milk (we used whole), 1 tsp ground cumin, and ¼ tsp nutmeg. Fold in the shallot-garlic-breadcrumb mixture. Fifth, using the same saute pan, pour 1 cup breadcrumbs and drizzle 1-2 Tbsp olive oil until lightly browned. Pour the wet mixture into the baking dish, then evenly cover with the browned breadcrumbs. Sixth, cover the baking dish with foil, and bake at 350 for 45 mins. Remove the foil and then continue baking for 15 mins. Let cool for at least 20 mins, then serve. (Sept. 2018)
-

We tried this recipe: https://www.koreanbapsang.com/gamjaguk-potato-soup/ Our modifications: first, the recipe called for garlic, but didn’t specify the amount; we used 4 minced garlic cloves. Second, we doubled the amount of beef to 8 oz (½ lb) but kept the soup soy sauce to 1 Tbsp. Third, we found the soup a little underseasoned, so we added 2 tsp Korean seasoned beef soup base (sogogi dashida) and 1 Tbsp fried shallots for depth. Finally, we cooked the sweet potato cellophane noodles separately and drained them. We added about ¼ cup of the cooked cellophane noodles to the soup bowl, then poured the soup overtop. (Sept. 2018)
Variation 1: Because this is a flexible recipe, we tried substituting the tofu with enoki and bonapi mushrooms. Perhaps as a result, we found the soup underseasoned, so we added about 1 Tbsp Korean beef soup base (sogogi dashida) and ½ tsp garlic powder. (Jan. 2019)
-

This is a version of a recipe I ate during my childhood. Also, technically the potato is not shredded, but cut into ½” sticks. The carrot and peppers are julienned. We followed this recipe: http://aeriskitchen.com/2011/08/potato-vegetable-bokkeum/ For the pepper, we used a red jalapeño (medium hot) and two green shishitos (mild). (Sept. 2018)
-

We tried this clever version of a Korean soy marinade typically used for beef. https://www.koreanbapsang.com/salmon-bulgogi/ Our modifications: to reduce sodium, we doubled the salmon to 2 lb but kept the marinade amount the same (for 1 lb). We also broiled the salmon pieces on a oil-sprayed baking rack set inside a foil-lined rimmed baking sheet, set at high, on the highest rack in the oven. It was challenging to flip the salmon pieces; we recommend using a flat hard spatula. The cooking time was about 8 mins. (Sept. 2018)
-

We tried this recipe from Once Upon a Chef: https://www.onceuponachef.com/recipes/vietnamese-style-meatballs-with-chili-sauce.html To reduce sodium, we used only 2 tsp (instead of 3 Tbsp, or 9 tsp) fish sauce in the meatball mixture (see Note below). We also skipped the chili dipping sauce entirely, squeezing fresh lime juice over the meatballs. We served the meatballs with red leaf lettuce (for lettuce wraps) and jasmine rice. (Sept. 2018)
Note: 2 tsp fish sauce left the meatballs slightly under seasoned. The next time, we will try 2 tsp fish sauce plus ½ tsp kosher salt.
-

We tried this NYT recipe: https://cooking.nytimes.com/recipes/1019261-lemon-sheet-cake-with-buttercream-frosting We made only a few modifications: first, we cut out parchment to cover only the bottom of the 9×13″ baking dish, but we left the sides alone. We secured the parchment to the bottom of the baking dish with a few dabs of unsalted butter on glass bottom, which made contact with the parchment underside. Then we greased the top of the parchment and the glass sides of the baking dish with more butter. To flour the buttered dish, we used a sifter to ensure only a light coat and fairly even distribution of flour. Second, for the granulated sugar, we used homemade citrus sugar (recipe here: http://piglettedc.tumblr.com/post/173869712321/citrus-sugar-we-tried-this-recipe). Third, we doubled the amount of fresh lemon zest in both the cake batter and in the icing, reserving some to garnish the finished, iced cake. (Sept. 2018)
-

We tried this recipe: https://www.foodandwine.com/recipes/whole-roast-chicken-with-40-brussels-sprouts Our modifications: first, based on prior reviews complaining of undercooked chicken and because we used a 5 ½ lb bird, we increased the total cooking time from 50 mins to nearly 2 hours (120 mins) at 450. Second, we started with the chicken breast side down, but at the 30 min mark, we flipped it to breast side up. Third, we found that the otherwise empty roasting pan started to noisily splatter with olive oil (which has a low smoking point). To counter that, around the 45 min mark, we added 6 small shallots (peeled and halved lengthwise, along the grain) tossed in ½ tsp corn oil (to raise the smoke point) to the pan. At the 25 min mark, we added the brussel sprouts and the fennel seeds (which we used instead of caraway). Instead of butter, we drizzled olive oil on the brussel sprouts so that they wouldn’t dry out. (Sept. 2018)
During the last 60 mins, we baked russet potatoes on another rack in the same oven, details here: http://piglettedc.tumblr.com/post/177671626126/oven-baked-potatoes-we-followed-this-recipe
-

We followed this recipe: https://cooking.nytimes.com/recipes/1016869-baked-potatoes We topped with plain Greek yogurt instead of sour cream. (Sept. 2018)
Note: The original recipe recommends baking at 450 for 45 mins. We sometimes modify this to 425 for 1 hour (even up to 1.5 hours) to bake concurrently with roast meat such as buttermilk roast turkey breast (roasted at 425 for 1 hour to 1.5 hours). In such a situation, we would place a rimmed baking sheet containing the foil-wrapped potatoes one level below the roasting meat. (Apr. 2024)
-

We made this childhood recipe in honor of Daniel’s beloved late mom. Because he couldn’t remember exact proportions, we followed these basic guidelines: https://orgasmicchef.com/mains/beef/meatloaf-recipe-from-the-last-century/
Our modifications: first, we preheated the oven to 350. Then we lined a rimmed baking sheet with foil; we recommend lightly spraying the foil with oil. Second, for the meatloaf mixture, we used 1 lb minced beef, ½ cup plus 1-2 Tbsp breadcrumbs, 1 tsp each minced sage and thyme, 1 egg, and 5 ½ oz (which is half a standard 11 oz can) of cream of mushroom soup. (We omitted butter, salt, and black pepper.) After molding the meatloaf (flat, about 2 inch tall) onto the foil-lined rimmed baking sheet, we sprinkled a heavy layer of breadcrumbs (up to ¼ cup) on top of the meatloaf. We baked at it in the middle rack of the oven at 350 for an hour. We heated the remaining 5 ½ oz cream of mushroom soup concentrate for gravy, diluting with about 2 Tbsp milk while simmering. (Aug. 2018)
We served the meatloaf with a side of oven-roasted broccolini, which we placed on the lower rack at 350 for the remaining 30 mins of the meatloaf baking. Basic recipe here: http://piglettedc.tumblr.com/post/177041048526/oven-roasted-broccolini-preheat-the-oven-at-450 Note that due to the lowered oven temperature, we doubled the roasting time.
-
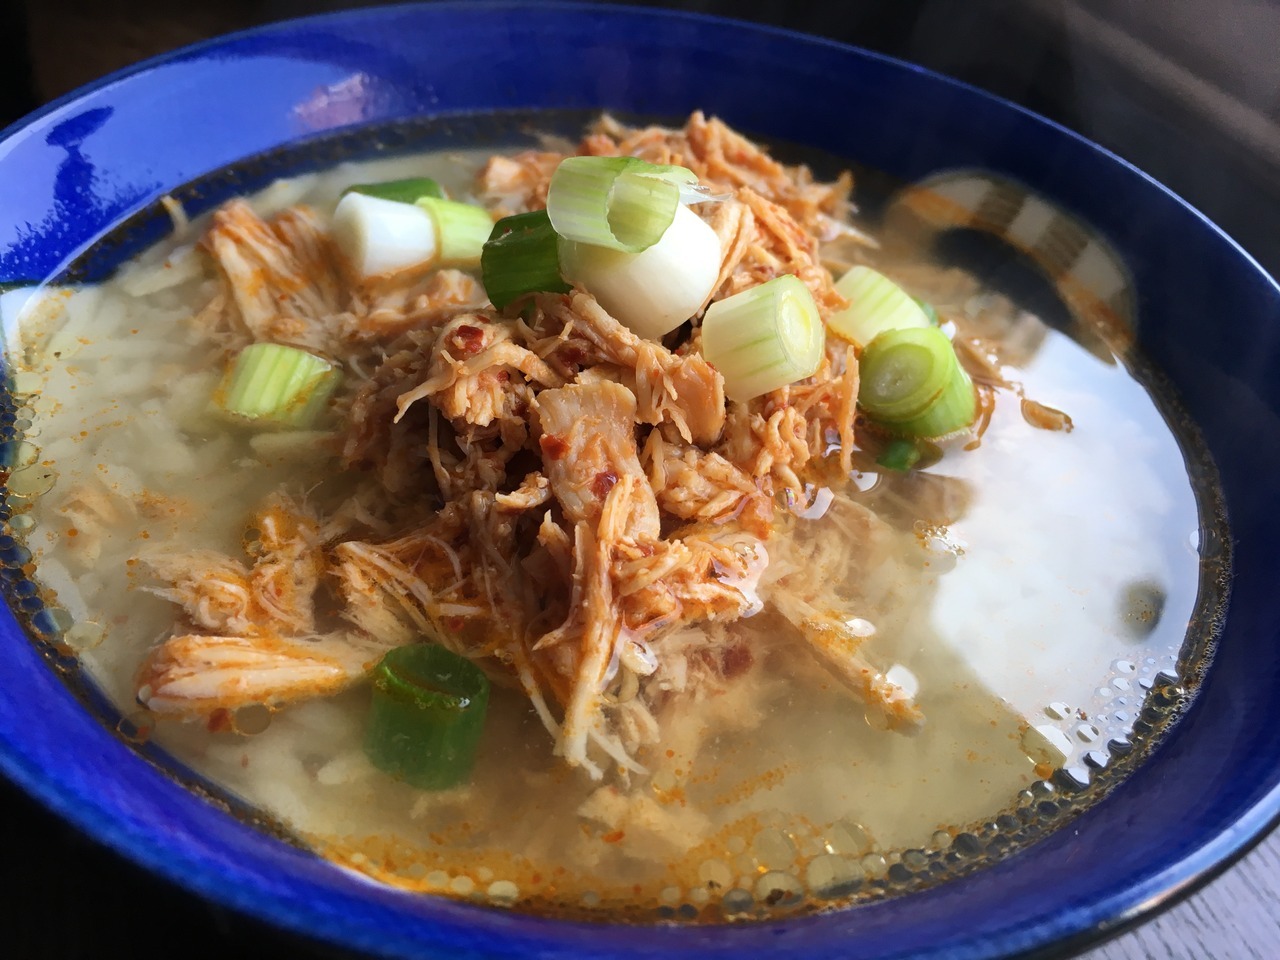
We found this recipe on the Facebook group, Instant Pot Korean recipes, and we made some modifications:
Ingredients:
For soup: 1 medium whole chicken (we used 2 bone-in, skin-on quarters and 2 bone-in, skin on breasts, about 5 lb total), 3 scallions (trimmed but otherwise whole), 1 garlic bulb (about 10-12 cloves, skin removed); and about 2 tsp freshly ground black pepper.
For yangnyum sauce: soy sauce, sesame oil, crushed red pepper flakes (no seeds), and garlic powder (see Note 2 below).
For garnish (and yangnyum): 2-3 scallions, chopped.
First, place chicken, 3 scallions, garlic and crack some pepper in the pot and pour water to cover chicken. Make sure to cover whole chicken (but see Note 1 below). Seal the top and start the heat. Once pressure reaches high, cook for 15 mins. At the end of 15 mins, turn off the heat and let the pressure cooker reduce on natural release for 10 mins. At the end of 10 mins, if the pressure hasn’t fully released by then, use manual release. Remove the chicken and scallions, pull the meat off the bones (I prefer using a pair of forks), and discard the bones and scallions (you can leave the garlic cloves in the broth). Mix the chicken meat with yangnyum sauce (see Note 2 below), tossing in about half of the chopped scallions. Finally, season the soup with salt and pepper according to taste.
To serve, in a bowl put some rice, broth, then add the seasoned chicken, and garnish with some remaining chopped scallions. Serve with salt and pepper.
Note 1: According to pressure cooking guidelines, you should never fill the pressure cooker pot more than halfway with liquid: https://www.dummies.com/food-drink/cooking/pressure-cooker/pressure-cookers-for-dummies-cheat-sheet (see “Don’t over do the liquid”). However, we have found that this soup can be safely made by simply not exceeding the “max fill” line, which is 2/3 full (not ½ full). If you can’t do this with a whole chicken, consider cutting the chicken into smaller pieces (such as in quarters and breasts), which can fit into the pressure cooker at a lower height than a whole chicken.
Note 2: “Yangnyum” refers to a simple mixture of soy sauce, sesame oil, garlic powder, and red pepper flakes that typically is used to season meats accompanying a mildly seasoned soup. For 5 lb cooked chicken, the yangnyum mixture will be about 3 Tbsp soy sauce, 2 Tbsp toasted sesame oil, 2 tsp Korean red pepper flakes (no seeds), and 1 tsp garlic powder. The seasoning is according to taste, so these measurements are approximate.
-
Subscribe
Subscribed
Have a WordPress.com account? Log in now.

